Last weekend I helped my mother host a shower for a good friend of hers. The decorations were really beautiful.
I loved this silver flower basket with hydrangeas, baby's breath, and a purple and white striped silk bow. So elegant!
My mother's treasured "Wedding Couple," antiques she brought back from England.
I love the idea of a homemade banner for any type of celebration. It feels so special!
There are a lot of steps to making one, but it's not at all difficult! The secret is variety-small paper flowers, big pom poms, & medium tassels on the sides, all in different tissue papers. Here's how to do it (I made this one day after school, so please pardon my messy classroom!):
CREATING THE LETTERS
Step 1: Print out your letters in the size/font that you prefer. Using carbon copy paper, trace them onto matboard, found at any craft store in the framing section (I don't recommend poster board as it curls up with the glue). If you don't want them to glitter the letters, you can use regular paper of any color!
2. Paint the front of the letters the same color of the glitter you will be using in case anything shows through.
3. Using Mod Podge or Elmer's and a brush, cover the letters with glue and glitter (glass glitter is the prettiest, but a bit more expensive).
4. Shake of the glitter and glue the letters onto a tissue paper of your choosing. Then, cut around the letters. You may need an exacto to get into the curved corners.
Next, measure out your ribbon according to where the piece will hang. The piece we hung it on was 6 feet, so I made by ribbon 9 feet to have some extra on the end and to give it a little sag. Line your letters up along the ribbon and attache with hot glue or masking tape to back.
CREATING THE TISSUE FLOWERS
Step 5: Cut a strip of tissue paper that is approx 7 inches x 12 inches. Accordion fold it.
Step 6: Trim the edges into a semi-circle.
Step 7: Cut a long piece of ribbon, at least 3-4 feet and tie around the center. Do not tie it at the very end of the ribbon, let one side be long and the other somewhere between 6-12 inches. Tie small knots in the ribbon for extra texture.
Step 8: Open up tissue and glue ends together to form a circle.
CREATING THE POM POMS
Step 9: Layer 4-5 sheets of a contrasting tissue paper. You can try more than that if you're gutsy! Cut the stack in half, so you have two stacks of paper approximately 12 inches x 20 inches. According fold into 1-1.5" sections.
Step 10: Tie a ribbon around the center, repeating step 7 above. Open circularly first, then separate the layers.
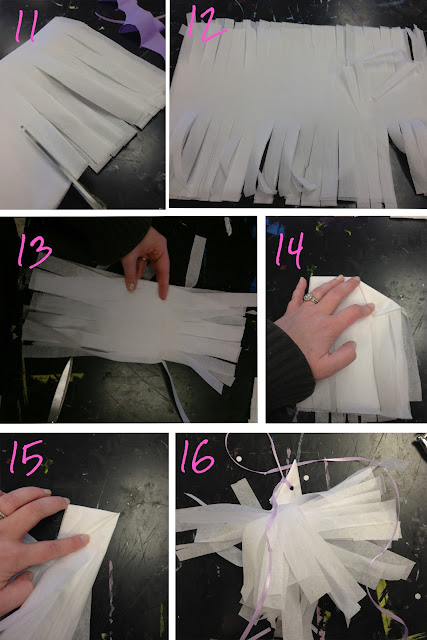
CREATING THE TASSELS
Step 11: Layer a couple of sheets of paper and cut down the center as in Step 9 above. Stack your two piles on top of each other. Fold in half long-ways and cut towards the fold, leaving about an inch along the fold.
Step 12: When you open the stack up, it should like like this!
Step 13: Each tassel uses 1 sheet of paper. Take one sheet, fold it in half, then fold it in half again to look like the image here.
Step 14: Fold the sheet in half the opposite way, so the fringe is all hanging down. Then take a corner along the center and fold it down to make a triangle.
Step 15: Continue to fold around the triangle.
Step 16: Punch a hold in the top and using the same method above, tie a ribbon through the hole.
Then, go ahead and assemble the sides. Lay out the pieces so the are different heights. Gather all the ribbons up at the top and them tie together. Keep the side pieces separate from the lettered piece until you are installing on-site. This way, you have flexibility with the length of the banner.
And voila! A beautiful banner!


